
How to invert a normal map’s green channel in Krita
Last Updated on 7. January 2022
This tutorial explains how to turn DirectX normal maps into OpenGL normal maps in Krita by inverting the green channel.
If you’re used to inverting a normal map channel in Photoshop by selecting the channel and pressing Ctrl+i, you might have noticed that this doesn’t work in Krita. Instead Krita inverts all colors in all layers. But it’s possible using a Color Adjustment curves filter instead.
The Color Adjustment curves filter
You can use this filter destructively (changes will be applied instantly to your image) or non-destructively (changes can be toggled on and off). To add the filter destructively, either press Ctrl+M or click on Filter -> Adjust -> Color Adjustment curves.
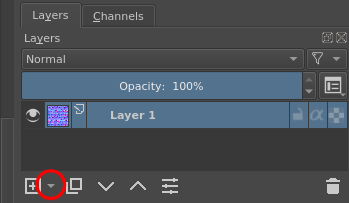
To add it non-destructively, go to your Layers tab on the right and click on the small arrow at the right side of the big plus sign for adding new layers. Select Filter Layer in the popup menu. Then open the Adjust category and select Color Adjustment.
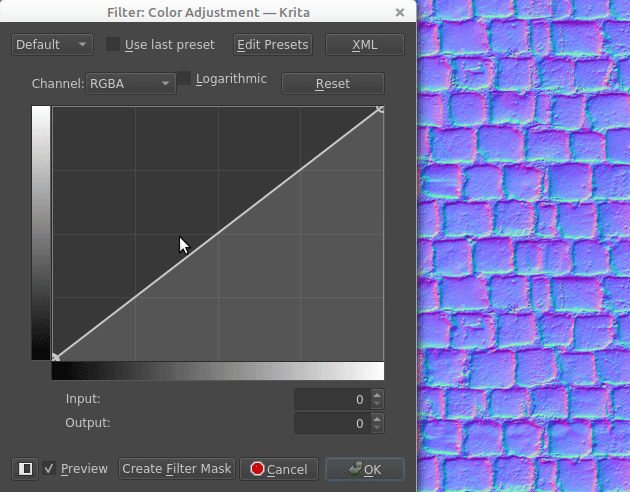
Either way you’ll end up in the Color Adjustment menu. Change the Channel from RGBA to Green. Drag the circle in the lower left corner up and the one in the upper right corner down. This inverts the green channel’s colors.
Saving a filter preset for inverting the green channel
You can save this green channel inversion as a preset. To do so, click on Edit Presets -> Bookmark Current. Double click the newly created preset to rename it. Select the preset by clicking in the drop-down menu in the upper left that reads Default and change it to your preset instead.
Visit the Krita Tutorials main page for more Krita tutorials.