
How to delete old revisions in SVN
Last Updated on 10. July 2023
This SVN tutorial for Windows and Linux explains how to delete the history of an SVN repository to save space. This is useful if you use SVN to manage binary data, like in game development with the Unreal Engine.
The TL;DR for experienced users (or to recap)
If you already know what you are doing, here’s everything you need. If none of this makes sense, read on.
svnadmin dump path_to_repo -r first_revision:last_revision > path_to_dump_file
svnadmin create path_to_new_repo
svnadmin load path_to_new_repo < path_to_dump_file
The concept of deleting old SVN revisions explained
- You decide for a range of revisions that you want to keep.
- You export this range of revisions as a single file, called a dump.
- You create a new, empty repository and import this dump into it.
When you commit something in SVN, SVN doesn’t save a full copy of the changed file. Instead, only changes to the previous version of this file are stored. However, the first revision in this dump doesn’t have a history, because you deliberately cut this history off to save disk space. When SVN creates the dump, it merges the entire history that came before the commit you want to start with into the new first commit.
Step 1/4: Installing svnadmin
To be able to modify the history of your SVN repository, you need to have svnadmin installed first.
On Windows
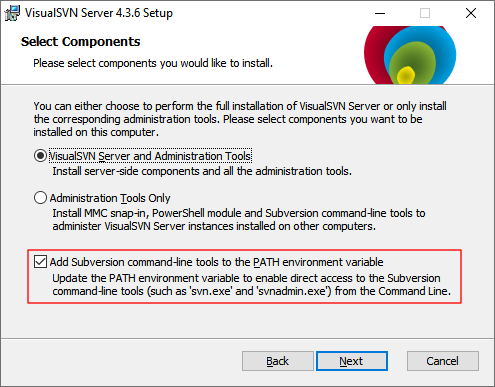
If you are on Windows, you are probably using VisualSVN Server to manage your SVN repositories. During the installation, there’s a checkbox called Add Subversion command-line tools to the PATH environment variable. The checkbox is enabled by default. Unless you have deliberately disabled it, you are good to go.
On Linux
Install the svnadmin package via your package manager.
On Debian/Ubuntu, do so by writing sudo apt install svnadmin into the Terminal.
Step 2/4: Creating the SVN dump file
First, we are going to save the revisions we want to keep to a single file.
Open the Windows PowerShell from the start menu or the Terminal on Linux. Then use the following syntax:
svnadmin dump path_to_repo -r oldest_revision:newest_revision > path_to_dumpfileFor example:
svnadmin dump C:\huge_repo -r 150:160 > C:\dumpfileThis saves revision 150 to 160 from the repository located at C:\huge_repo into a file called dumpfile and stores it on C:\.
If the newest revision you want to keep is the latest commit in this repo, you can also write HEAD instead of the latest revision number (e.g. 150:HEAD).
Step 3/4: Creating an empty SVN repo
You need a new empty repo to load the dump file. Create the new repo like this:
svnadmin create path_to_new_repoFor example:
svnadmin create C:\new_repoStep 4/4: Importing the SVN dump
Lastly, you need to import the dump file into the new empty repo. It works like this:
svnadmin load path_to_empty_repo < path_to_dumpfileFor example:
svnadmin load C:\my_new_svn_repo < C:\dumpfileYou can delete the dump file once is has been successfully imported into the new empty repo.
Visit the Version Control Tutorials main page for more Version Control tutorials.