
How to export Tilesets from Blender to Godot
Last Updated on 28. September 2025
This tutorial is also available as a Guide on Steam.
It was written for Godot 3.x. Some details might be different in Godot 4.
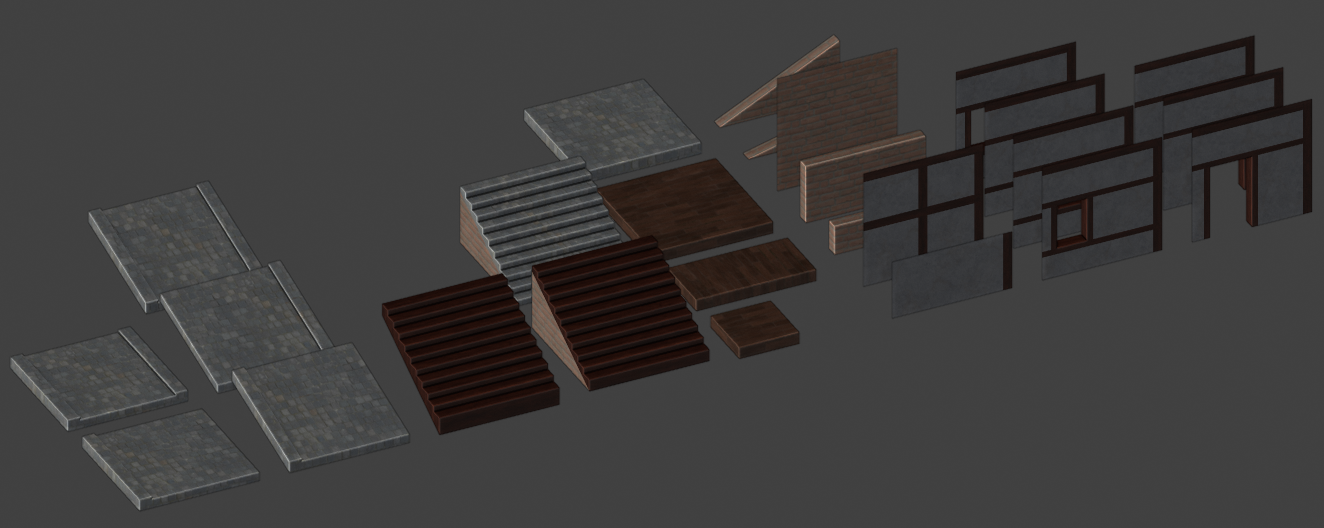
This tutorial will teach you how to prepare tilesets in Blender for export to Godot, how to use the .escn exporter for Blender and how to configure the tileset in Godot in a way that allows easy updating if your meshes change later on.
Our goal is to be able to update existing tileset parts later on without having to repeatedly fix any pivots or materials and to have an easy transition from the meshes in Blender to the parts inside Godot.
We will not use Godot’s Gridmaps for this tutorial. This tutorial is aimed at a workflow where the tileset parts are arranged manually with Godot’s snapping tools. However, you should be able to make use of the info in this tutorial for setting up Gridmaps if that is your intended workflow.
Preparing the tileset in Blender
Make sure all individual tileset parts follow these rules:
- The part’s name follows your nomenclature (e.g. wall_large_brick_01). You can rename objects with F2
- Pivots are at the correct place
- Rotation and Scaling is applied (Ctrl+A -> Rotation & Scale)
- The materials on your meshes are named correctly
Creating materials in Godot
Before we export anything to Godot, you should create all materials in Godot that are used in the tileset scene in Blender and name them exactly the same as in Blender. It doesn’t matter where you store the materials in your project folder, but the names have to match. This way Godot can automatically assign these materials to your meshes when we export them.
Why don’t we let Godot create the materials?
- The material in Blender does not necessarily look like the final material inside your game. Maybe you only use the Albedo texture in Blender and the full PBR setup in Godot. In this case Godot would only import the Albedo texture and you’d have to manually import Normal and Roughness later.
- If you have already imported all textures into your Godot project, but the material for a tileset part does not exist, Godot will create the missing material. But if the textures for this material are not in the same folder as the material, Godot will import them again unnecessarily. You’ll end up with the same textures in different folders.
For those two reasons I prefer to create the materials myself before I export any meshes.
Exporting from Blender to Godot
Installing the .escn addon
Download the .escn exporter from GitHub. There’s a green Code button in the upper right. Click it and select Download ZIP. There’s an io_scene_godot folder inside the zip archive. Copy the entire io_scene_godot folder into Blender’s addon folder. The addon folder can be found in Blender’s installation location under Blender/[current version]/scripts/addons.
Activate the addon in Blender by clicking on Edit -> Preferences -> Addons. Search for Godot and enable the Godot Engine Exporter.
Exporting to Godot
We will export all tileset parts as one file. Godot can decompose the file back into its parts. We’ll save a lot of time this way because we don’t have to export each tileset piece individually.
If your Blender scene only contains the tileset parts and nothing else, you don’t have to select anything. If there are other parts inside the file you don’t want to export, only select the tileset parts you want to export.
Click on File -> Export -> Godot Engine (.escn).
You can leave all settings at their default values. If you have selected only certain parts of your tileset, you have to enable Only Selected Objects.
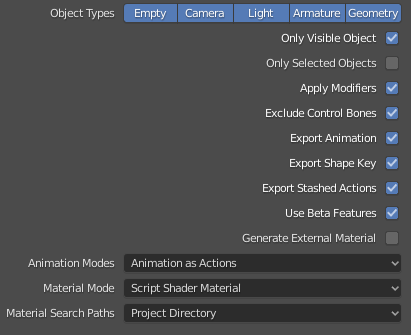
Generate External Material should remain disabled, because we already have created the materials in Godot.
For this tutorial, export the file into a subfolder called Tileset/Parts and name the file _Tileset. I’ll explain why later. Export everything by clicking on Export to Godot. Make sure to select an export location inside your Godot project, otherwise the export will fail.
Splitting the tileset up again
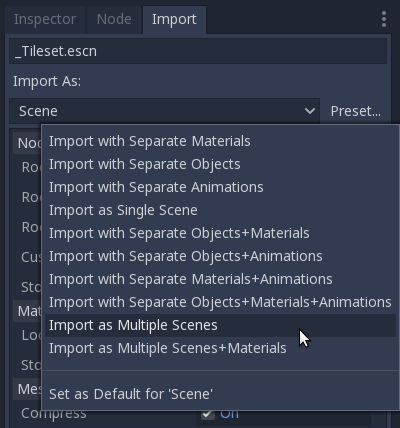
Switch to Godot after exporting the file and Godot will import it. You’ll end up with a single file called _Tileset in a Tileset/Parts folder. Select the _Tileset file, switch to the Import tab, click on Preset… and select Import as Multiple Scenes. The preset will be loaded and you can click on the Reimport button to reimport the file. The file will be automatically split into the original parts. Each part is saved as a single .scn file.
Creating a new scene for every part
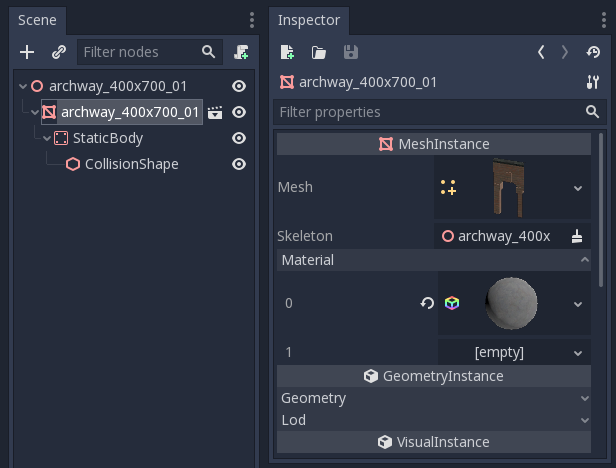
If you open one of the new .scn files you should find a mesh node with one of the tileset parts. If you have set up your materials correctly, the material will automatically be assigned. But there’s a problem: the mesh is not in the center of your scene. It has the same offset as in Blender. We shouldn’t reset the position inside the Godot scene, because every time you re-export the tileset, all changes will be lost and the mesh will be off again. Here’s what we’ll do for every .scn part instead:
- Create a new empty 3D scene, so you have a Spatial node as its root
- Drag and drop the .scn file as a child onto the Spatial node. It will turn into a mesh
- Reset the mesh node’s Translation to 0,0,0
- Copy the mesh node’s name to the Spatial node, so they are called the same
- Save the scene one folder above your Parts folder (the Tileset folder, if you used the names in this tutorial). The final scene will have the file extension .tscn and the same name as your tileset part
You’ll end up with all your final tileset parts in your Tileset folder. The unpacked .scn files are one layer below in the Parts folder, where the original _Tileset file can be found as well. The underscore makes it easier to find, because it will always be the last file in this folder.
Of course you can structure this any other way, but I found this setup easy to work with.
(Re)importing changed parts
Updating parts is very easy now. Close all scenes in Godot that use the parts you want to update (Godot currently has problems updating meshes that are in use), make your changes in Blender, reexport the .escn file, jump back into Godot and your changes will appear instantly. Even if the pivots should change in Blender, the pivots in your final .tscn files will stay the same.
If you have added new parts to your set, they’ll be added to your Parts folder. Just follow the same procedure as before and save them as new scenes.
Overriding materials
You can’t override materials in your .scn part files, all changes will be lost when you reimport the parts. But you can override them in the final .tscn files. Changes made here will survive mesh reimports.
Select the mesh inside your .tscn file and open the Material category. Drag and drop materials onto the empty material slots to replace the material in this slot with another one.
Visit the Godot Tutorials main page for more Godot tutorials